For my next project, following in the great traditions of animators like Ray Harryhausen, I decided to animate in stop motion a familiar folk tale. It should ideally need only one set, moderate action, a manageably small set of characters, and be narratable in about two or (at a pinch) three minutes. The Norwegian folk tale of the Three Billy Goats Gruff was one of my favourites, and seemed practical. This post is the story of how I made this:
Research
I read some versions of the tale, and timed some narration. We don't seem to have trolls in Scotland, but we do have goats, and I wanted to get some video of them, to see how they moved, ate grass, butted each other and so on.
I phoned up Fife Animal Park to ask if they had any goats. Yes, they said. So on a cold March day I went by train and footpath, past swans swimming in icy lakes and along country roads, to the park, by which time it was snowing. It turned out that Fife Animal Park was a heaven for goats. Not only that, but while other animals were sheltering in their straw-filled dens, there were lots of goats running about, of various shapes/sizes/colours/ages, trying to cadge feed off hardy visitors. I took lots of useful reference video, which was particularly helpful as I couldn't easily find what I was looking for online (maybe I'll post some editing clips in future).

Storyboarding
The storyboarding was straightforward: one beginning panel, three panels (one for each) of the goat–troll encounters, and one ending panel.
Script
My first attempt at the script departed from the traditional with some asides and scene-setting, but when I timed it, it took over four minutes to read. That's a lot of still frames. I went back to quite a cut-down, traditional reading, without the more quirky (by modern day) or poetic parts. This was a much more realistic 2 minutes and 20 or so seconds.
Sound
Narrating the shorter script was easier on my voice, too. I recorded it in five separate files (one per scene) in Garageband using the Male Narrator track preset, using a Yeti USB microphone with pop shield. I found that the best voice I could produce was a relaxed, subdued story-telling rhythm, although I had to create four other voices for the three goats and the troll. I suppose I must have made funny faces while recording those, but we'll never know.
I didn't really do any sound editing apart from trimming to edit out non-speech time. However, I probably should have adjusted the amplitude upwards at the start of Scene 2, where it begins a bit quietly.
Materials
There were a lot of different materials used in the making of sets, models and props. I sourced some locally, some online. I'll cover these in the following sections.
Tools
I read that a hot glue gun would be useful, and turned out to be particularly handy for covering large areas quickly, like sticking stones to board, or grass card to papery hills. And the usual: scissors, rule, needle, pliers, hobby vice, model holder with crocodile grips and magnifying glass, paintbrush, hammer, pencil, clamps.
Set
Only one set was needed. I started with a 900 by 600 mm board. This was to have a stream running the length, so I needed to create two shores. The near shore (where the goats would start) was a plank of balsa wood covered with part of a card sheet of simulated grass, from my local hobbies shop. This was fixed loosely enough so that small steel plates (from a DIY store) could be slid underneath and moved about, to support the magnetic feet of the models.
The farthest shore was made from scrunched newspaper hilly clumps, covered with Modrock plaster of paris bandages, in turn covered with the rest of the simulated grass sheet of card, glued down with a hot glue gun. A clump of three plastic trees on the horizon added a sense of scale and perspective.
The stream was made up of a blue painted bed, lined with white aquarium stones and sand (lightly glued), and a filled with a layer of around 3 mm of special water feature liquid, which took a more than a day to fully set. This gave a nice reflective, transparent surface.
Models
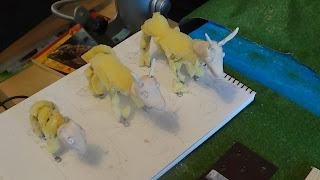
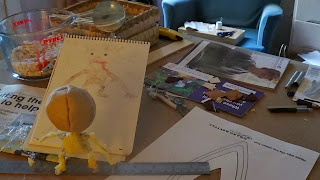
For the three goats and the troll, I started with to-scale pencil sketches. These were sized to fit reasonably within the dimensions of the set. Then I created basic armatures with 3.2 mm aluminium wire spines, hand-twisted 1 mm aluminium wire limbs, with the loops at one end forming hooves/hands/feet, to which I glued small (3 mm diameter, 2 mm thick) round neodymium magnets.
The legs were attached to the spine with joints made of Milliput polymer clay (mix two kinds together, mould, and it sets in hours). The set clay was a little softer than I expected, but it held up quite well.
The goat bodies were padded out with strips of foam cut from the innards of an old seat cushion, glued on with epoxy glue. The heads were made from baked Sculpey clay, with holes for eyes and horns, and the bottom jaws cut off and baked separately. The horns were made of twisted wire like the legs, covered with clay and baked. The looped ends fitted into the skulls. White beads were painted (badly; I was trying to get the distinctive elongated black pupil on yellow, but the watercolour paint rubbed off) for eyes, which were set in the sockets using modelling wax, which held them while allowing for movement. The hooves were more Milliput, which covered the magnets, but it did tend to crumble during walking. I probably needed to seal it with some hard lacquer or something.
The goat bodies were covered with acrylic felt (in cream, tan and brown for different goats), roughly cut to measure and stuck on with latex glue which retains flexibility, plus some stitching on legs. The acrylic felt turned out to be a great material to work with: nicely textured, malleable and trimmable, and importantly did not retain finger indentations or move about on its own when animating. The bottom edge of the coats were snipped to give a look halfway between a hairy pelt and a buckskin coat.
The heads were stuck on the spines and painted (again, wrong kind of paint which rubbed off), and ears, manes, beards and eyebrows (most important for expression) stuck on. The jaws were attached at the back of the mouth with a tiny blob of modelling wax.
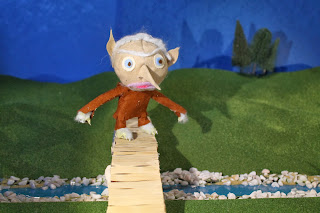
The troll was made in much the same way, but I was stumped for a while about the head. In the end, I used a pattern to cut out six felt sinusoidal strips, sew them together and stuff the resulting ball with cotton wool. This was light enough to balance on the squat, long-armed body. Magnets were used in both feet and hands, which had wire claws added for extra menace. Offcuts from the felt head panels were folded at the base to provide ears and nose, the nose strengthened with wire.
The troll's head had to be detachable in order for it to fit under the bridge. A rubber washer was added to the bottom of the head to make it fit better on top of the 3.2 mm aluminium wire neck extending the top of the spine. I was pleased how the troll could balance on top of the bridge.
The bridge itself was steel plates sitting on baked clay reinforced with aluminium wire uprights, covered with strips cut from a wicker-type basket to resemble wooden planks.
I dyed some cotton wool light grey with a very diluted black ink and used it for troll hair, eyebrows, wispy beard and on hands and feet. The troll's eyes and mouth were cut from another type of fuzzier felt. Different mouth shapes were used for replacements. This turned out to be quite successful in animating, although the features did fall off quite often, being only held on by natural fuzziness. The troll's body was clothed in a fourth (russet) shade of brown from my excellent-value acrylic felt pack. The troll should match its "eyes like saucers, nose like a poker" description.
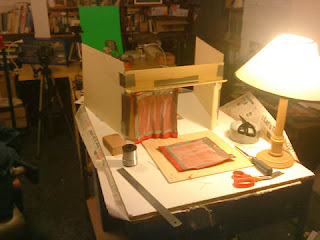
Lighting
Three bendable, clampable LED lights were used for key, fill and backlighting. The blue, textured card used for background turned out to be quite dark for sky, but it did not seem to matter that much. Perhaps the slightly different light directions for each goat suggested a different time of day, but my main concern was to light the models and set adequately.
Camera
This time, I set the colour temperature manually, which gave a slightly more natural look to the grass (less yellowy). I wish I had gone full manual from the start; there were all sorts of auto-focussing problems in the first scene.
Software
Boinx iStopmotion 2 Home version was used for putting together the animation from the digital camera. Garageband was used for audio, and iMovie for the final edit.
Animation
Measurement and timing
The animation rate was 12 frames per second, and the movie size set to 960 by 540 pixels (large widescreen).
Scene 1
The first scene simply introduces the three goats in a family group, looking across the stream to a grassy hillside. Lighter-coloured powdered 'grass' is dropped a pinch per frame to create a kind of increasing glow. I should have fixed the manual focus here. The scene ends on a pan along the stream and a short zoom in on the bridge, as the goats plan their route over the obstacle.
Scene 2
The second scene follows the littlest billy goat Gruff as he makes his way to and on to the bridge. We have a bit of a stiff walk cycle here. The magnetic hooves are gripping the undersurface steel plates well, but the wire legs are a little inflexible and I suspect the goat has a dislocated hip.
The troll (just a head to begin with) makes his appearance. His body language is intended to show a possessive, affectionate relationship with his bridge.
All shots were done in sequence except the reverse views of goats on the bridge ramp. These were all done as a group, actually picking up and reversing the ramp after the other bridge shots were done, so the set and camera remain in the same positions.
The littlest billy goat gradually slides back down the ramp (which wasn't strictly intentional, but seemed to work), darting a look towards his brothers.
Scene 3
The third scene shortens the walk to the bridge for the middle billy goat Gruff. His wiry body is flexible and stable enough to lean one way then another, looking for the troll. The troll indulges in an impressive display of eye-rolling, which is quite easy to do with the felt. The troll's mouth is made from two pale lips, one crimson centre of two or three shapes, and two small triangular teeth, all of fuzzy felt. The lip synching is roughly gauged, but fairly effective, I think.
The timing of the goat's eye-brow and ear raising to coincide with the word "much" is entirely intentional, and helps to convey the goat's opportunistic character.
Scene 4
For the fourth scene, I used some new camera angles. The steady progression from small, quaking goat to large, steadfast goat is an essential part of the story, and can be suggested by many aspects of narration, modelling, animation, shot-framing, timing and so on. The other essential aspect is that, in spite of all these signs, the troll does not catch on… until too late!
I did have the shameful thought of making the troll animation of appearing and getting on to the bridge the same sequence (well, that would save animation time and effort, would it not?), but I quickly realized that I should do the opposite, and make these distinctively different. What is the psychology of the troll? Is he helping to fool himself? Is he getting increasingly desperate for a meal?
The troll is despatched, but presumably intact and a bit wiser, and no longer poses a threat to the goats' plans.
Scene 5
The final scene sees the goats enjoying the spoils. Some extra stuffing in the first two goats suggests that they've already been eating the green felt grass. As in the introduction, movement is limited and rationed, usually only one goat at a time.
Editing
The animation sequences were exported from iStopMotion, and the audio segments from Garageband, and combined in iMovie for video editing. Titles and a short animation (Sleeping Dog) ident were added.
Captioning
Captions were created by marking up the script in Timed Text Markup Language.
Publishing
The final video was published to YouTube, and the captions file uploaded. A slightly higher quality version is kept for DVD distribution.


